Text to Image
DeepSeek V3 vs V4 Architecture Infographic — AI Image Prompt
A dense side-by-side technical infographic comparing DeepSeek V3/R1 and DeepSeek V4 transformer architectures, suitable for social media posts, presentations, or model analysis visuals. - AIPinMaker
Prompt
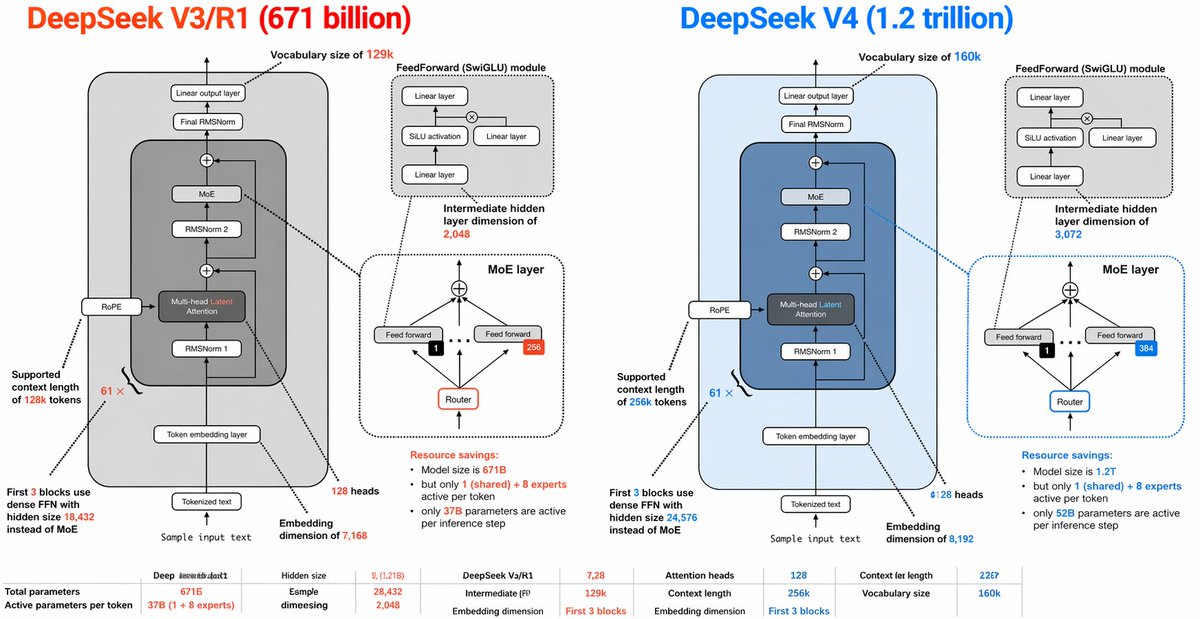
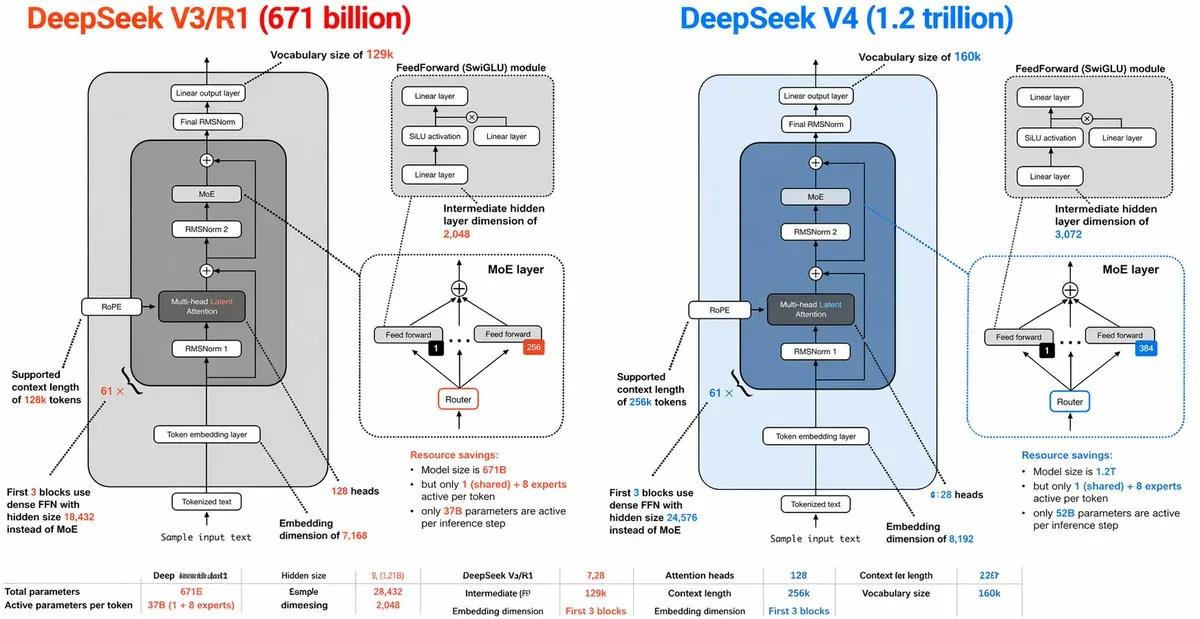
{"type":"side-by-side AI architecture comparison infographic","style":"clean technical diagram, white background, thin black outlines, rounded rectangles, dashed callout boxes, color-coded highlights, presentation-slide aesthetic, vector infographic","canvas":{"aspect_ratio":"2:1","resolution":"wide horizontal"},"title_row":{"left_title":"DeepSeek V3/R1 (671 billion)","right_title":"DeepSeek V4 (1.2 trillion)","left_title_color":"bright orange-red","right_title_color":"bright blue"},"layout":{"columns":2,"sections":[{"title":"DeepSeek V3/R1 (671 billion)","position":"left half","count":9,"labels":["Vocabulary size of 129k","FeedForward (SwiGLU) module","Intermediate hidden layer dimension of 2,048","MoE layer","Supported context length of 128k tokens","First 3 blocks use dense FFN with hidden size 18,432 instead of MoE","Sample input text","Embedding dimension of 7,168","128 heads"]},{"title":"DeepSeek V4 (1.2 trillion)","position":"right half","count":9,"labels":["Vocabulary size of 160k","FeedForward (SwiGLU) module","Intermediate hidden layer dimension of 3,072","MoE layer","Supported context length of 256k tokens","First 3 blocks use dense FFN with hidden size 24,576 instead of MoE","Sample input text","Embedding dimension of 8,192","128 heads"]},{"title":"bottom comparison table","position":"bottom full width","count":10,"labels":["Total parameters","Active parameters per token","Hidden size","Esmple dimesiegn","DeepSeek V3/R1","Intermediate (FF)","Attention heads","Context length","Embedding dimension","Vocabulary size"]}]},"left_panel":{"background":"very light gray rounded rectangle","main_stack":{"count":8,"blocks":["Tokenized text","Token embedding layer","RMSNorm 1","Multi-head Latent Attention","RMSNorm 2","MoE","Final RMSNorm","Linear output layer"]},"side_module":"RoPE attached to the attention block on the left side","attention_block":{"label":"Multi-head Latent Attention","accent":"orange-red text for the word Latent"},"feedforward_inset":{"title":"FeedForward (SwiGLU) module","count":4,"blocks":["Linear layer","SiLU activation","Linear layer","Linear layer"],"diagram":"two branches multiplied, then projected"},"moe_inset":{"title":"MoE layer","count":5,"blocks":["top combine node","Feed forward","Feed forward","Router","expert count badge 256"],"details":"small black square with 1 selected expert, arrows routing upward to experts, dotted divider line"},"annotations":{"vocab":"Vocabulary size of 129k","ff_dim":"Intermediate hidden layer dimension of 2,048","context":"Supported context length of 128k tokens","dense_first_blocks":"First 3 blocks use dense FFN with hidden size 18,432 instead of MoE","resource_savings":"Resource savings: Model size is 671B but only 1 (shared) + 8 experts active per token; only 37B parameters are active per inference step"},"bottom_stats":{"count":10,"items":["Total parameters: 671B","Active parameters per token: 37B (1 + 8 experts)","Hidden size: 7,128","Esmple dimesiegn: 28,432","Intermediate (FF): 2,048","Attention heads: 128","Context length: 128k","Embedding dimension: First 3 blocks","Context ler length: 22G7","Vocabulary size: 129k"]}},"right_panel":{"background":"very light blue rounded rectangle","main_stack":{"count":8,"blocks":["Tokenized text","Token embedding layer","RMSNorm 1","Multi-head Latent Attention","RMSNorm 2","MoE","Final RMSNorm","Linear output layer"]},"side_module":"RoPE attached to the attention block on the left side","attention_block":{"label":"Multi-head Latent Attention","accent":"blue text for the word Latent"},"feedforward_inset":{"title":"FeedForward (SwiGLU) module","count":4,"blocks":["Linear layer","SiLU activation","Linear layer","Linear layer"],"diagram":"same structure as left panel"},"moe_inset":{"title":"MoE layer","count":5,"blocks":["top combine node","Feed forward","Feed forward","Router","expert count badge 384"],"details":"small black square with 1 selected expert, arrows routing upward to experts, dotted divider line, blue border emphasis"},"annotations":{"vocab":"Vocabulary size of 160k","ff_dim":"Intermediate hidden layer dimension of 3,072","context":"Supported context length of 256k tokens","dense_first_blocks":"First 3 blocks use dense FFN with hidden size 24,576 instead of MoE","resource_savings":"Resource savings: Model size is 1.2T but only 1 (shared) + 8 experts active per token; only 52B parameters are active per inference step"},"bottom_stats":{"count":10,"items":["Total parameters: 1.2T","Active parameters per token: 52B (1 + 8 experts)","Hidden size: 7,2B","Esmple dimesiegn: 28,432","Intermediate (FF): 3,072","Attention heads: 128","Context length: 256k","Embedding dimension: First 3 blocks","Context ler length: 22G7","Vocabulary size: 160k"]}},"global_notes":"Create a highly detailed transformer architecture comparison diagram with mirrored layouts. Each half contains one large model stack diagram plus 2 inset diagrams: 1 feedforward module and 1 MoE layer. Use arrows between blocks, tiny technical labels, and connector lines from labels to the relevant components. Keep the typography dense and slide-like, with orange-red used for all V3/R1 emphasis and blue used for all V4 emphasis. Include a small bottom row of compact tabular metrics spanning the width. Preserve the slightly imperfect, human-made infographic look with very small text and crowded annotations."}Prompt breakdown
- Subject
- side-by-side DeepSeek V3/R1 (671B) versus V4 (1.2T) transformer architecture comparison with MoE, SwiGLU, and Multi-head Latent Attention insets
- Style
- clean technical vector diagram, white background, thin black outlines, rounded rectangles, dashed callout boxes, orange-red and blue highlights, presentation-slide aesthetic
- Composition
- two-column mirrored layout with main token-to-output stacks, separate FFN and MoE inset diagrams, bottom full-width stats table, and connector lines to annotations
- Mood
- dense technical presentation with crowded but readable typography and color-coded emphasis on parameter scaling differences
Remix ideas
- increase V4 expert badge from 384 to 512 while updating the active-parameter callout to 58B
- replace the bottom stats row with training-token counts instead of hidden-size values
- add a third column showing a hypothetical V5 with 512k context and 512 experts
Reference images
How to use this AI Image prompt template
 1
1Copy the prompt — grab this template’s prompt and negative prompt.  2
2Pick a model — choose a recommended AI model for the best match.  3
3Generate — open the studio with one click and create your result.
Related templates

Japanese LP Psychology 8-Step Infographic
{"type":"Japanese marketing infographic","topic":"high-converting landing page structure guided by user psychology","style":{"look":"clean flat business infographic","palette":{"primary":"blue","secondary":"green","neutral":"white and light gray","accent":"dark navy headline with one highlighted blue numeral"},"background":"plain white","lines":"thin gray connectors and borders","icons":"simple circular line icons in blue and green","aspect_ratio":"16:9 landscape"},"headline":{"text":"CVRの高いLPは{argument name=\"number of elements\" default=\"8\"}要素で心理を前に進める","position":"top center","emphasis":"the numeral is large and bright blue"},"layout":{"columns":3,"sections":[{"title":"ユーザー心理","position":"left column","count":8,"items":[{"index":1,"icon":"eye","label":"何のサービスか気になる","subtext":"まずは目に留まり、注意が向く"},{"index":2,"icon":"magnifying glass","label":"もっと知りたいと思う","subtext":"興味を持ち、内容を読み進める"},{"index":3,"icon":"thought cloud","label":"自分ごととしてイメージする","subtext":"利用シーンを想像し、自分に関係があると感じる"},{"index":4,"icon":"heart","label":"欲しい・解決したいと思う","subtext":"メリットを感じ、欲求が高まる"},{"index":5,"icon":"balance scale","label":"他と比べて良さそうだと思う","subtext":"比較して、優位性や違いを理解する"},{"index":6,"icon":"check mark badge","label":"信頼できると感じて納得する","subtext":"根拠や実績を確認し、安心して決められる"},{"index":7,"icon":"running person","label":"今すぐ行動しようと思う","subtext":"迷いがなくなり、行動に移る"},{"index":8,"icon":"smiling face","label":"使ってよかったと感じる","subtext":"成果を実感し、満足・信頼が深まる"}]},{"title":"LP全体構成(ワイヤーフレーム)","position":"center column","count":8,"items":[{"index":1,"label":"Attention(注意)","wireframe":"logo at top, main hero block with headline and CTA button","text":"キャッチコピーで課題や価値を一言で伝える"},{"index":2,"label":"Interest(興味)","wireframe":"image placeholder and text block","text":"サービス・商品の特徴や課題の解決方法を紹介"},{"index":3,"label":"Image(想像)","wireframe":"wide image placeholder","text":"利用シーン・導入後の未来をイメージできる構成"},{"index":4,"label":"Desire(欲求)","wireframe":"three small circular icons and text","text":"得られるベネフィット/価値を提示し『欲しい』と思わせる"},{"index":5,"label":"Comparison(比較)","wireframe":"comparison table grid","text":"他社・代替手段との違いや優位性を明確にする"},{"index":6,"label":"Consent(納得)","wireframe":"star rating, avatar, testimonial lines","text":"実績・お客様の声・データで信頼性を補強し、納得を促す"},{"index":7,"label":"Action(行動)","wireframe":"large CTA area with dark button","text":"今すぐ始める/無料で試すなど行動を後押しするCTA"},{"index":8,"label":"Satisfaction(満足)","wireframe":"circular arrow support icon and text","text":"導入後のサポート・保証・返金制度など安心材料で満足・リピートにつなげる"}],"extra_labels":["LOGO","CTAボタン","今すぐ申し込む"]},{"title":"役割","position":"right column","count":8,"items":[{"index":1,"icon":"megaphone","text":"注意を引き、スクロールを促す導入パート"},{"index":2,"icon":"open book","text":"興味を持たせ、読み進める動機をつくるパート"},{"index":3,"icon":"picture frame","text":"自分ごと化を促し、利用イメージを具体化するパート"},{"index":4,"icon":"heart","text":"ベネフィットを訴求し、『欲しい』を引き出すパート"},{"index":5,"icon":"balance scale","text":"比較によって、選ぶ理由を明確にするパート"},{"index":6,"icon":"shield","text":"信頼・安心を提供し、意思決定のハードルを下げるパート"},{"index":7,"icon":"cursor arrow","text":"行動を後押しし、コンバージョンを生むパート"},{"index":8,"icon":"smile face","text":"満足・信頼を高め、継続・紹介につなげるパート"}]}],"connectors":"dotted horizontal guide lines connect each of the 8 center stages to matching items in the left and right columns; small downward arrows connect stacked cards in the left column"},"footer":{"style":"rounded rectangular note bar with light background and thin blue outline","icon":"light bulb","text":"ユーザーの心理を段階的に前へ進めることで、自然な流れでCVRを最大化できます。"},"composition":"top headline, three evenly spaced vertical columns beneath it, eight aligned horizontal rows across the page, symmetrical educational slide design for a landing page optimization manual","quality":"sharp vector text, presentation-slide clarity, polished corporate training material"}3d:T1407,{"type":"Japanese marketing infographic","topic":"high-converting landing page structure guided by user psychology","style":{"look":"clean flat business infographic","palette":{"primary":"blue","secondary":"green","neutral":"white and light gray","accent":"dark navy headline with one highlighted blue numeral"},"background":"plain white","lines":"thin gray connectors and borders","icons":"simple circular line icons in blue and green","aspect_ratio":"16:9 landscape"},"headline":{"text":"CVRの高いLPは{argument name=\"number of elements\" default=\"8\"}要素で心理を前に進める","position":"top center","emphasis":"the numeral is large and bright blue"},"layout":{"columns":3,"sections":[{"title":"ユーザー心理","position":"left column","count":8,"items":[{"index":1,"icon":"eye","label":"何のサービスか気になる","subtext":"まずは目に留まり、注意が向く"},{"index":2,"icon":"magnifying glass","label":"もっと知りたいと思う","subtext":"興味を持ち、内容を読み進める"},{"index":3,"icon":"thought cloud","label":"自分ごととしてイメージする","subtext":"利用シーンを想像し、自分に関係があると感じる"},{"index":4,"icon":"heart","label":"欲しい・解決したいと思う","subtext":"メリットを感じ、欲求が高まる"},{"index":5,"icon":"balance scale","label":"他と比べて良さそうだと思う","subtext":"比較して、優位性や違いを理解する"},{"index":6,"icon":"check mark badge","label":"信頼できると感じて納得する","subtext":"根拠や実績を確認し、安心して決められる"},{"index":7,"icon":"running person","label":"今すぐ行動しようと思う","subtext":"迷いがなくなり、行動に移る"},{"index":8,"icon":"smiling face","label":"使ってよかったと感じる","subtext":"成果を実感し、

Google Fonts Japanese Tutorial Infographic
{"type":"Japanese infographic","topic":"How to use Google Fonts","style":"clean modern flat design, white background, soft pastel blue and mint corner blobs, rounded cards with subtle shadows, tech tutorial aesthetic, crisp vector typography and UI illustrations","canvas":{"aspect_ratio":"16:9"},"headline":{"main":"Google Fontsの使い方","sub":"基本の3ステップ"},"layout":{"sections":[{"title":"1. フォントを選ぶ","position":"left","count":1,"labels":["1. フォントを選ぶ"],"card_style":"rounded white panel with light blue border/shadow","icon":"blue numbered circle with 1","illustration":"browser window showing a font search interface, 3 visible font preview rows with large Aa あ samples, a search bar at top, small colored window buttons, light gray interface lines and blue accent dashes","body_text":"Google Fontsのサイトで、好きな書体を探します。"},{"title":"2. 埋め込みコードを取得","position":"center","count":1,"labels":["2. 埋め込みコードを取得"],"card_style":"rounded white panel with light blue border/shadow","icon":"blue numbered circle with 2","illustration":"dark code panel with two labeled code examples separated by a thin divider","code_blocks":{"count":2,"labels":["<link> (HTML)","@import (CSS)"],"content":["<link href=\"https://fonts.googleapis.com/css2?family=Poppins:wght@400;600&display=swap\" rel=\"stylesheet\">","@import url('https://fonts.googleapis.com/css2?family=Noto+Sans+JP:wght@400;700&display=swap');"]},"body_text":"表示された<link>やCSSをコピーします。"},{"title":"3. CSSで適用","position":"right","count":1,"labels":["3. CSSで適用"],"card_style":"rounded white panel with light blue border/shadow","icon":"blue numbered circle with 3","illustration":"white code card containing CSS with two selectors and font-family rules","code_blocks":{"count":2,"labels":[".title","body"],"content":[".title { font-family: 'Poppins', sans-serif; }","body { font-family: 'Noto Sans JP', sans-serif; }"]},"body_text":"font-familyを指定して、デザインに反映します。"},{"title":"ポイント","position":"bottom-left","count":3,"labels":["読みやすさで選ぶ","日本語対応を確認する","使いすぎず、2〜3種類に絞る"],"card_style":"rounded white panel with pale blue tint","icon":"blue star in a circle","body_format":"bullet list"},{"title":"よく使う組み合わせ","position":"bottom-center-right","count":2,"labels":["見出し: Poppins","本文: Noto Sans JP"],"card_style":"rounded white panel with pale lavender tint","icon":"purple linked-rings symbol","body_format":"two pill-shaped example boxes"}],"connectors":{"count":2,"style":"large blue right-pointing arrows between the 3 top cards"},"pagination":{"text":"2 / 2","position":"bottom-right","style":"blue rounded corner tab"}},"text_language":"Japanese","color_palette":{"primary_blue":"#2f80ff","navy":"#0f2b5b","google_colors":["#4285F4","#DB4437","#F4B400","#0F9D58"],"lavender":"#8b6cff","background":"#ffffff"}}3a:Tbd9,{"type":"Japanese infographic","topic":"How to use Google Fonts","style":"clean modern flat design, white background, soft pastel blue and mint corner blobs, rounded cards with subtle shadows, tech tutorial aesthetic, crisp vector typography and UI illustrations","canvas":{"aspect_ratio"

Software Shortcut Infographic
Create a infographic image of Software Shortcut Infographic. Style: photorealistic. Composition: balanced and well-framed. Lighting: natural with cinematic mood. Category: illustration. Reference: software-shortcut-infographic-14722.

Momotaro Explainer Slide in Hybrid Style
Create a creative image of Momotaro Explainer Slide In Hybrid Style. Style: photorealistic. Composition: balanced and well-framed. Lighting: natural with cinematic mood. Category: photography. Reference: momotaro-explainer-slide-in-hybrid-style-13983.

Infographic Explaining Fibonacci Sequence with Math and Code
Create a cinematic image of Infographic Explaining Fibonacci Sequence With Math And Code. Style: photorealistic. Composition: balanced and well-framed. Lighting: natural with cinematic mood. Category: cinematic-video. Reference: infographic-explaining-fibonacci-sequence-with-math-and-code-1867.

Minimalist Exploded View Industrial Design Diagram - Nano Banana Pro AI Prompt for Infographic / Edu Visual
{ "prompt": { "objective": "Create a colorful minimalist exploded view of a chair with clearly labeled parts", "style": "minimalist, modern industrial design, flat yet slightly 3D, clean lines, soft shadows", "composition": "chair centered in frame, all components separated vertically in an exploded view, evenly spaced, balanced layout", "subject": { "type": "chair", "chair_style": "modern ergonomic chair", "parts": [ "Headrest", "Backrest", "Lumbar Support", "Seat Cushion", "Seat Base", "Armrests", "Armrest Pads", "Gas Lift Cylinder", "Tilt Mechanism", "Five-Star Base", "Caster Wheels", "Screws and Fasteners" ], "labels": "clear part names placed beside each component, thin connector lines, clean sans-serif font" }, "colors": "bright yet soft colors for each part, pastel and vibrant mix, each component in a different color, white or very light background", "lighting": "soft studio lighting, gentle shadows under each floating part", "camera": { "angle": "slight isometric view for depth", "focus": "all parts sharp and readable" }, "extra": "educational product diagram look, no clutter, modern design presentation, Instagram-friendly composition" }, "size": "1024x1024", "format": "png", "style_transfer": false }
Explore more prompts
Browse more AI image and video prompts by category.
FAQ
- Why does the infographic show only eight experts active per token for both models?
- The diagram emphasizes the sparse MoE design where 1 shared plus 8 routed experts are selected, keeping active parameters at 37B for V3/R1 and 52B for V4 despite much larger total sizes.
- What changes are highlighted between the first three blocks and the rest of the network?
- Both panels note that the initial three blocks replace the MoE layer with a dense FFN of hidden size 18,432 on the left and 24,576 on the right, shown via separate annotation callouts.