Text to Image
3-Panel Duct Tape Meme Comic — AI Image Prompt
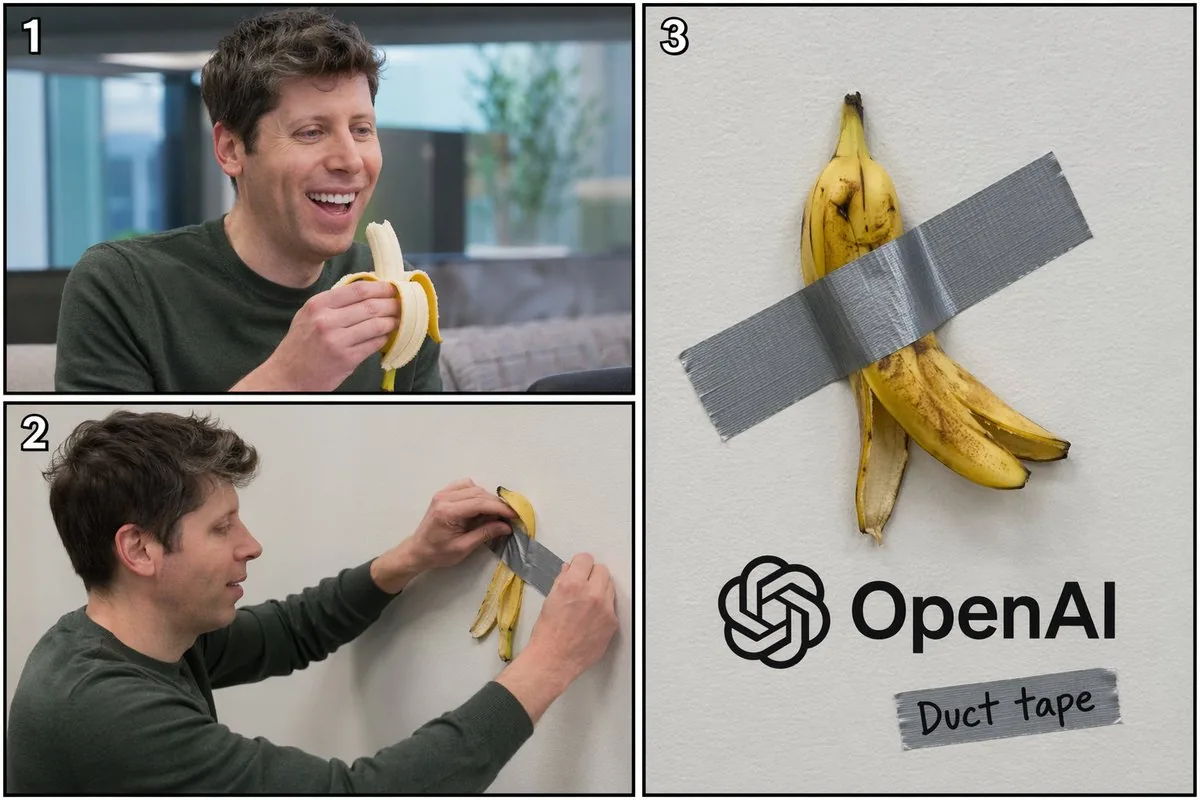
Generates a 3-panel comic showing a subject eating a fruit and taping the peel to a wall, parodying modern art and tech companies. - AIPinMaker
Prompt
{
  "type": "3-panel comic layout",
  "subject": "{argument name=\"subject\" default=\"Sam Altman\"}",
  "object": "{argument name=\"object\" default=\"banana\"}",
  "layout": {
    "structure": "left side split horizontally into two panels, right side is one large vertical panel",
    "panels": [
      {
        "number": "1",
        "position": "top-left",
        "description": "The subject is smiling widely and eating the object in an office setting."
      },
      {
        "number": "2",
        "position": "bottom-left",
        "description": "The subject is seen in profile, using a strip of silver duct tape to attach the peel of the object to a plain white wall."
      },
      {
        "number": "3",
        "position": "right-half",
        "description": "Close-up of the object's peel duct-taped to the white wall. Below it is the {argument name=\"company logo\" default=\"OpenAI\"} logo and text. Below the logo is another piece of duct tape with the handwritten text '{argument name=\"tape text\" default=\"Duct tape\"}'."
      }
    ]
  }
}Prompt breakdown
- Subject
- Sam Altman eating a banana then duct-taping its peel to a white office wall
- Style
- 3-panel meme comic layout
- Composition
- left side split horizontally into top and bottom panels, right side one large vertical panel
- Mood
- absurd corporate humor
Remix ideas
- swap the subject to another tech CEO and update the logo text accordingly
- change the handwritten tape text to a different punchline like "Ship it"
- replace the banana with an apple to change the peel shape and color in all panels
Reference images
How to use this AI Image prompt template
 1
1Copy the prompt — grab this template’s prompt and negative prompt.  2
2Pick a model — choose a recommended AI model for the best match.  3
3Generate — open the studio with one click and create your result.
Related templates

Hand-Drawn Storyboard Previs Sketch
Create a rough hand-drawn PREVIS + rescue chase storyboard page in 16:9 horizontal format. Use an extremely simple 2D previs sketch style: - stick figures / mannequin silhouettes only - no facial detail, no costume detail, no anatomy detail - no texture, no shading, no polished rendering - black loose sketch lines - red boxes for camera framing only - blue arrows for motion / force / breath / direction only - rough director thumbnails, not concept art - if unsure, draw less detail, not more Show 8 numbered panels on one page with slightly irregular but readable placement. Subject: two close friends racing on skateboards through the sky above the clouds (subject) Environment: bright open sky, fluffy cloud pathways, floating cloud banks, distant sunlight, then a darker storm-cloud zone with wind, rain and lightning (environment) Mood: playful, adventurous, fast, funny, suspenseful for a moment, then uplifting and triumphant Sequence: during a fun cloud-skate race, one friend accidentally drifts into dangerous storm clouds and loses control, then the other friend makes a last-second rescue Beats: 1. Wide establishing shot. Two friends on skateboards surf above the clouds, side by side, racing playfully through the sky. 2. Side tracking shot. The race speeds up. One friend leans forward and gains a little lead while the other follows close behind. 3. 3/4 front angle. The leading friend accidentally veers toward a dark storm-cloud area ahead while still focused on the race. 4. Overhead shot. The storm cloud swallows the lead friend. Strong wind arrows, rain and lightning. The skateboard wobbles violently. 5. Close-up / medium action shot. The second friend notices the danger, brakes hard for a split second, then pivots and dives toward the storm. 6. Dynamic low angle. The rescuer shoots into the storm clouds on the skateboard, reaching forward through wind and lightning toward the trapped friend. 7. Hero side shot. Last-second rescue. The rescuer grabs the other friend by the arm or hoodie and pulls them free from the storm cloud just as lightning strikes behind them. 8. Wide payoff shot. Both friends burst back into the sunny clouds, regain balance, keep riding together and continue the race laughing, now side by side. Use varied camera angles: close-up, wide, low angle, overhead, side profile, rear, 3/4. Add short handwritten notes near panels. Maintain clear continuity of subject, props, environment and movement direction. Focus on staging, camera, motion, timing and continuity. Prioritize readability over drawing quality. Avoid detailed illustration, clean UI and infographic design. Tone target: fun family-animation energy, clear visual storytelling, simple readable action be

16-Panel Medieval Duel Storyboard
{"type":"black-and-white medieval combat storyboard sheet","style":{"rendering":"high-detail grayscale fantasy illustration, realistic armor and anatomy, clean white background, light studio shadow under figures, editorial storyboard look","camera":"side-view profile for most panels, consistent distance and character scale, one closer mid-shot for the wound impact panel","mood":"instructional, dramatic, tactical"},"subject":{"characters":[{"role":"warrior","description":"lean armored knight with full helmet, longsword, dark cape, agile stance"},{"role":"gatekeeper","description":"larger heavily built bearded warrior with long wild hair or mane-like head silhouette, layered heavy armor and furs, carrying a large double-headed battle axe"}]},"layout":{"grid":{"columns":4,"rows":4,"count":16},"numbering":"each panel has a black square number badge in the top-left corner from 1 to 16","sections":[{"title":"1 Standoff","position":"row 1 col 1","count":1,"labels":["Warrior and Gatekeeper face each other. Both assess distance and openings."],"image":"both fighters stand apart in mirrored ready stances, sword and axe lowered, horizontal double-headed arrow between them"},{"title":"2 Gatekeeper Advances","position":"row 1 col 2","count":1,"labels":["Gatekeeper steps in with axe raised. Warrior shifts stance, preparing."],"image":"large axe wielder moves forward, warrior braces with sword angled low, directional arrows under both"},{"title":"3 Overhead Swing","position":"row 1 col 3","count":1,"labels":["Gatekeeper delivers a heavy overhead axe strike. Warrior raises sword to intercept."],"image":"axe lifted high above the head with a curved swing arrow, warrior lifting sword defensively"},{"title":"4 Steel Clash","position":"row 1 col 4","count":1,"labels":["Sword meets axe with a loud clash. Sparks fly as both fighters strain for leverage."],"image":"weapons collide at center with bright impact sparks and opposing motion arrows"},{"title":"5 Warrior Sidestep","position":"row 2 col 1","count":1,"labels":["Warrior sidesteps left, avoiding the axe's full force. Gatekeeper over extends slightly."],"image":"swordsman slips to the side with cape sweeping out, axe user leaning forward, curved motion arrow"},{"title":"6 Low Slash","position":"row 2 col 2","count":1,"labels":["Warrior slashes low towards Gatekeeper's leg to off-balance him."],"image":"low horizontal sword cut aimed at the front leg, gatekeeper recoiling"},{"title":"7 Gatekeeper Reels","position":"row 2 col 3","count":1,"labels":["Gatekeeper is cut and staggered, his balance broken. He tries to recover footing."],"image":"large fighter pulled backward and unstable, sword fighter resetting nearby, down arrow and footwork arrow"},{"title":"8 Warrior Presses In","position":"row 2 col 4","count":1,"labels":["Warrior steps in aggressively, closing distance before Gatekeeper can raise his guard."],"image":"warrior lunges forward with sword extended, gatekeeper opens his guard, long horizontal arrow across the ground"},{"title":"9 Axe Block Attempt","position":"row 3 col 1","count":1,"labels":["Gatekeeper swings axe horizontally to block and create space."],"image":"close-range defensive sweep from the axe wielder, warrior compressed low inside the motion"},{"title":"10 Sword Deflect","position":"row 3 col 2","count":1,"labels":["Warrior deflects the axe with a sharp turn of the blade, opening a lane."],"image":"sword redirects the axe outward, arrows showing the redirection and opening line"},{"title":"11 Feint High","position":"row 3 col 3","count":1,"labels":["Warrior feints a high strike. Gatekeeper raises guard and shifts his focus upward."],"image":"warrior lifts sword toward the head with dotted and curved motion arcs, gatekeeper reacting high"},{"title":"12 Body Slip","position":"row 3 col 4","count":1,"labels":["Warrior slips inside Gatekeeper's guard, positioning for a decisive thrust."],"image":"the swordsman moves chest-to-chest inside the axe range, bodies turned diagonally, enclosing motion arrows"},{"title":"13 Thrust to the Heart","position":"row 4 col 1","count":1,"labels":["Warrior thrusts his sword directly toward Gatekeeper's heart."],"image":"tight forward sword thrust into the torso, both figures in strong forward lean"},{"title":"14 Impact","position":"row 4 col 2","count":1,"labels":["The blade pierces deep into Gatekeeper's heart. Blood bursts from the wound."],"image":"closest panel in the sheet, sword embedded in chest, visible blood spatter, gatekeeper grimacing"},{"title":"15 Gatekeeper Falls","position":"row 4 col 3","count":1,"labels":["Gatekeeper collapses to his knees, strength fading fast."],"image":"large fighter dropping down, axe fallen to the ground, warrior stepping back, downward arc arrow"},{"title":"16 Aftermath","position":"row 4 col 4","count":1,"labels":["Gatekeeper lies still. Warrior remains standing, victorious."],"image":"final tableau with the dead gatekeeper on the ground and the warrior standing over him holding the sword downward"}],"textStyle":"bold black sans-serif panel numbers in square boxes, bold panel titles across the top of each panel, small explanatory caption text on the left side inside each panel"},"prompt":"Create a {argument name=\"headline text\" default=\"16-panel medieval duel storyboard\"} as a clean 4x4 grid of sixteen numbered panels showing a complete fight sequence between two consistent fantasy characters: a {argument name=\"hero type\" default=\"lean armored warrior with a longsword and cape\"} and a {argument name=\"opponent type\" default=\"massive gatekeeper with a double-headed battle axe\"}. Render everything in detailed grayscale on a white background like a combat instruction sheet or cinematic storyboard. Keep the same side-view orientation and character proportions throughout, with motion arrows in every panel that clarify movement and weapon paths. Use these exact panel titles and captions: 1 Standoff, 2 Gatekeeper Advances, 3 Overhead Swing, 4 Steel Clash, 5 Warrior Sidestep, 6 Low Slash, 7 Gatekeeper Reels, 8 Warrior Presses In, 9 Axe Block Attempt, 10 Sword Deflect, 11 Feint High, 12 Body Slip, 13 Thrust to the Heart, 14 Impact, 15 Gatekeeper Falls, 16 Aftermath. Include the exact explanatory caption sentence under each title as described in the layout. Panel 14 should be a slightly closer shot showing the sword piercing the chest with a visible blood burst. The final result should feel like a printable action-planning sheet for animating a duel, with consistent characters, readable action silhouettes, and a clear beginning, escalation, decisive strike, and ending."}

Vintage Patent Document for an Invention
Create a creative image of Vintage Patent Document For An Invention. Style: photorealistic. Composition: balanced and well-framed. Lighting: natural with cinematic mood. Category: photography. Reference: vintage-patent-document-for-an-invention-3438.

Cloudflare Catch-All Email Routing Infographic
Goal: Create a landscape hand-drawn notebook-style Chinese infographic explaining how to register multiple ChatGPT accounts by using Cloudflare Email Routing to create catch-all mailbox aliases. Canvas: Wide 16:9 whiteboard page, clean off-white background, surrounded by a thick black dashed rounded border. Use a casual marker-and-pen sketch style with slightly imperfect lines, doodle arrows, stars, question marks, pins, and small expressive icons. Title and intro: At the top center, write the bold headline 注册 ChatGPT 第 N 个账号:用 Cloudflare 造邮箱(手绘笔记) (headline text). Underline “Cloudflare” in blue. Beneath it on the left, write the pain point line: “痛点:同个邮箱只能注册一个账号,换邮箱麻烦。” Add a small curved arrow doodle and star near the title. Main layout: Use exactly 7 main content boxes/cards plus decorative doodles. Arrange them left-to-right as a process with bold black arrows connecting sections. The 7 cards are: 1 pain card, 1 solution card, 1 core-principle card, and 4 numbered step cards. Card 1, pain card: A red outlined sticky-note box on the upper left with a sad red face icon. Text: “想注册新号?没新邮箱!” Make it look like a folded-corner note. Card 2, solution card: A blue rounded rectangle in the upper middle with a blue cloud icon. Text: “解决方案:Cloudflare Email Routing(邮箱路由)”. Put a blue arrow pointing toward the core principle box. Card 3, core principle card: A large black-outlined rounded rectangle in the upper right. Header text: “核心原理:Catch-all(通配符 / 捕获所有)”. Include a funnel icon. Show exactly 4 example incoming aliases on the left: “chatgpt@”, “netflix@”, “test1@”, and “任意前缀@”. Draw arrows from all four into a large “@” symbol and “@你的域名.com”, then a thick black arrow to a mailbox icon labeled “真实邮箱(如 Gmail)”. Bottom line with green check icon: “全部自动转发,统一汇总!无需提前创建。” Step cards along the bottom: Use exactly 4 numbered boxes. Step 1 card, bottom left: Title “第一步:准备工作”. Include exactly 3 numbered requirements: “1. Cloudflare 账号(免费注册)”, “2. 你的域名(DNS 托管在 CF)”, “3. 真实邮箱(接收转发)”. Add a globe icon, a green check mark, and a yellow key icon. Below it add small text: “域名推荐:性价比高(如 top域名)”. Step 2 card, bottom center-left: Title “第二步:启用并验证目标邮箱”. Include a small computer icon labeled “CF 控制台”. Text flow: “添加域名 → 解析 → 激活”. Draw an arrow down to a mini DNS nameserver panel with two columns: left “阿里云(修改 NS)”, right “Cloudflare(等待生效,状态:活动)”. Beneath the card, draw a red circled nameserver list with exactly 2 entries: “gene.ns.cloudflare.com” and “peyton.ns.cloudflare.com”. Add a small clock icon and text “约30分钟”. Step 3 card, bottom center-right: Title “第三步:设置邮件路由”. Show a mini Cloudflare UI mockup with exactly 2 top tabs/boxes: “Email(电子邮件)” and “Email Routing(路由)”. Include a small “Get Started” button pointing to “绑定目标地址(Destination address)”. At the bottom add an envelope icon and text: “验证邮件 → 点击确认”. Under this card place a small blue status note titled “测试转发成功” with two arrow lines showing an alias forwarding to a Gmail address. Step 4 card, bottom right: Title “第四步:设置路由规则(核心步骤)”. Show a UI panel titled “Catch-all 规则设置”. Include a blue toggle switch labeled “Active(启用)”. Include a two-row table with headers and values: row 1 “Action(操作)” to “Send to(发送至)”; row 2 “Destination(目标)” to “你的真实邮箱”. Add a red star near the corner. Final result box: At the bottom right below Step 4, add a green rounded rectangle with a smiling face icon. Text: “效果:注册时随意编造前缀(例如 chatgpt@yourdomain.com)邮件全部统一汇总到真实邮箱,实现「邮箱自由」!全程免费!” Visual style: Handwritten Chinese typography, thick black marker outlines, simple vector doodles, blue/red/green/yellow accent colors, informal classroom note-taking feel. Keep all arrows bold and directional, with minor sketchy imperfections. Constraints: Keep the entire infographic in Chinese as specified, use no photorealism, no 3D rendering, no watermark, no extra sections beyond the 7 cards and final result box, and make the text legible.3b:T12a5,Goal: Create a landscape hand-drawn notebook-style Chinese infographic explaining how to register multiple ChatGPT accounts by using Cloudflare Email Routing to create catch-all mailbox aliases. Canvas: Wide 16:9 whiteboard page, clean off-white background, surrounded by a thick black dashed rounded border. Use a casual marker-and-pen sketch style with slightly imperfect lines, doodle arrows, stars, question marks, pins, and small expressive icons. Title and intro: At the top center, write the bold headline 注册 ChatGPT 第 N 个账号:用 Cloudflare 造邮箱(手绘笔记) (headline text). Underline “Cloudflare” in blue. Beneath it on the left, write the pain point line: “痛点:同个邮箱只能注册一个账号,换邮箱麻烦。” Add a small curved arrow doodle and star near the title. Main layout: Use exactly 7 main content boxes/cards plus deco

Oriental Gongbi Style Pet Portrait
Create a portrait image of Oriental Gongbi Style Pet Portrait. Style: photorealistic. Composition: balanced and well-framed. Lighting: natural with cinematic mood. Category: portrait. Reference: oriental-gongbi-style-pet-portrait-23485.

Japanese LP Psychology 8-Step Infographic
{"type":"Japanese marketing infographic","topic":"high-converting landing page structure guided by user psychology","style":{"look":"clean flat business infographic","palette":{"primary":"blue","secondary":"green","neutral":"white and light gray","accent":"dark navy headline with one highlighted blue numeral"},"background":"plain white","lines":"thin gray connectors and borders","icons":"simple circular line icons in blue and green","aspect_ratio":"16:9 landscape"},"headline":{"text":"CVRの高いLPは{argument name=\"number of elements\" default=\"8\"}要素で心理を前に進める","position":"top center","emphasis":"the numeral is large and bright blue"},"layout":{"columns":3,"sections":[{"title":"ユーザー心理","position":"left column","count":8,"items":[{"index":1,"icon":"eye","label":"何のサービスか気になる","subtext":"まずは目に留まり、注意が向く"},{"index":2,"icon":"magnifying glass","label":"もっと知りたいと思う","subtext":"興味を持ち、内容を読み進める"},{"index":3,"icon":"thought cloud","label":"自分ごととしてイメージする","subtext":"利用シーンを想像し、自分に関係があると感じる"},{"index":4,"icon":"heart","label":"欲しい・解決したいと思う","subtext":"メリットを感じ、欲求が高まる"},{"index":5,"icon":"balance scale","label":"他と比べて良さそうだと思う","subtext":"比較して、優位性や違いを理解する"},{"index":6,"icon":"check mark badge","label":"信頼できると感じて納得する","subtext":"根拠や実績を確認し、安心して決められる"},{"index":7,"icon":"running person","label":"今すぐ行動しようと思う","subtext":"迷いがなくなり、行動に移る"},{"index":8,"icon":"smiling face","label":"使ってよかったと感じる","subtext":"成果を実感し、満足・信頼が深まる"}]},{"title":"LP全体構成(ワイヤーフレーム)","position":"center column","count":8,"items":[{"index":1,"label":"Attention(注意)","wireframe":"logo at top, main hero block with headline and CTA button","text":"キャッチコピーで課題や価値を一言で伝える"},{"index":2,"label":"Interest(興味)","wireframe":"image placeholder and text block","text":"サービス・商品の特徴や課題の解決方法を紹介"},{"index":3,"label":"Image(想像)","wireframe":"wide image placeholder","text":"利用シーン・導入後の未来をイメージできる構成"},{"index":4,"label":"Desire(欲求)","wireframe":"three small circular icons and text","text":"得られるベネフィット/価値を提示し『欲しい』と思わせる"},{"index":5,"label":"Comparison(比較)","wireframe":"comparison table grid","text":"他社・代替手段との違いや優位性を明確にする"},{"index":6,"label":"Consent(納得)","wireframe":"star rating, avatar, testimonial lines","text":"実績・お客様の声・データで信頼性を補強し、納得を促す"},{"index":7,"label":"Action(行動)","wireframe":"large CTA area with dark button","text":"今すぐ始める/無料で試すなど行動を後押しするCTA"},{"index":8,"label":"Satisfaction(満足)","wireframe":"circular arrow support icon and text","text":"導入後のサポート・保証・返金制度など安心材料で満足・リピートにつなげる"}],"extra_labels":["LOGO","CTAボタン","今すぐ申し込む"]},{"title":"役割","position":"right column","count":8,"items":[{"index":1,"icon":"megaphone","text":"注意を引き、スクロールを促す導入パート"},{"index":2,"icon":"open book","text":"興味を持たせ、読み進める動機をつくるパート"},{"index":3,"icon":"picture frame","text":"自分ごと化を促し、利用イメージを具体化するパート"},{"index":4,"icon":"heart","text":"ベネフィットを訴求し、『欲しい』を引き出すパート"},{"index":5,"icon":"balance scale","text":"比較によって、選ぶ理由を明確にするパート"},{"index":6,"icon":"shield","text":"信頼・安心を提供し、意思決定のハードルを下げるパート"},{"index":7,"icon":"cursor arrow","text":"行動を後押しし、コンバージョンを生むパート"},{"index":8,"icon":"smile face","text":"満足・信頼を高め、継続・紹介につなげるパート"}]}],"connectors":"dotted horizontal guide lines connect each of the 8 center stages to matching items in the left and right columns; small downward arrows connect stacked cards in the left column"},"footer":{"style":"rounded rectangular note bar with light background and thin blue outline","icon":"light bulb","text":"ユーザーの心理を段階的に前へ進めることで、自然な流れでCVRを最大化できます。"},"composition":"top headline, three evenly spaced vertical columns beneath it, eight aligned horizontal rows across the page, symmetrical educational slide design for a landing page optimization manual","quality":"sharp vector text, presentation-slide clarity, polished corporate training material"}3d:T1407,{"type":"Japanese marketing infographic","topic":"high-converting landing page structure guided by user psychology","style":{"look":"clean flat business infographic","palette":{"primary":"blue","secondary":"green","neutral":"white and light gray","accent":"dark navy headline with one highlighted blue numeral"},"background":"plain white","lines":"thin gray connectors and borders","icons":"simple circular line icons in blue and green","aspect_ratio":"16:9 landscape"},"headline":{"text":"CVRの高いLPは{argument name=\"number of elements\" default=\"8\"}要素で心理を前に進める","position":"top center","emphasis":"the numeral is large and bright blue"},"layout":{"columns":3,"sections":[{"title":"ユーザー心理","position":"left column","count":8,"items":[{"index":1,"icon":"eye","label":"何のサービスか気になる","subtext":"まずは目に留まり、注意が向く"},{"index":2,"icon":"magnifying glass","label":"もっと知りたいと思う","subtext":"興味を持ち、内容を読み進める"},{"index":3,"icon":"thought cloud","label":"自分ごととしてイメージする","subtext":"利用シーンを想像し、自分に関係があると感じる"},{"index":4,"icon":"heart","label":"欲しい・解決したいと思う","subtext":"メリットを感じ、欲求が高まる"},{"index":5,"icon":"balance scale","label":"他と比べて良さそうだと思う","subtext":"比較して、優位性や違いを理解する"},{"index":6,"icon":"check mark badge","label":"信頼できると感じて納得する","subtext":"根拠や実績を確認し、安心して決められる"},{"index":7,"icon":"running person","label":"今すぐ行動しようと思う","subtext":"迷いがなくなり、行動に移る"},{"index":8,"icon":"smiling face","label":"使ってよかったと感じる","subtext":"成果を実感し、
Explore more prompts
Browse more AI image and video prompts by category.
FAQ
- How is the panel layout arranged in this comic prompt?
- Two smaller panels stack vertically on the left showing Sam Altman eating then taping, while the right half holds one tall close-up of the duct-taped peel over the OpenAI logo.
- Why include the specific OpenAI logo and "Duct tape" text?
- They anchor the joke to real branding and turn the taped banana peel into a visual corporate meme that lands in the final panel.