テキストから画像
Sketch to CAD-Style Line Art Conversion Prompt — AI 画像プロンプト
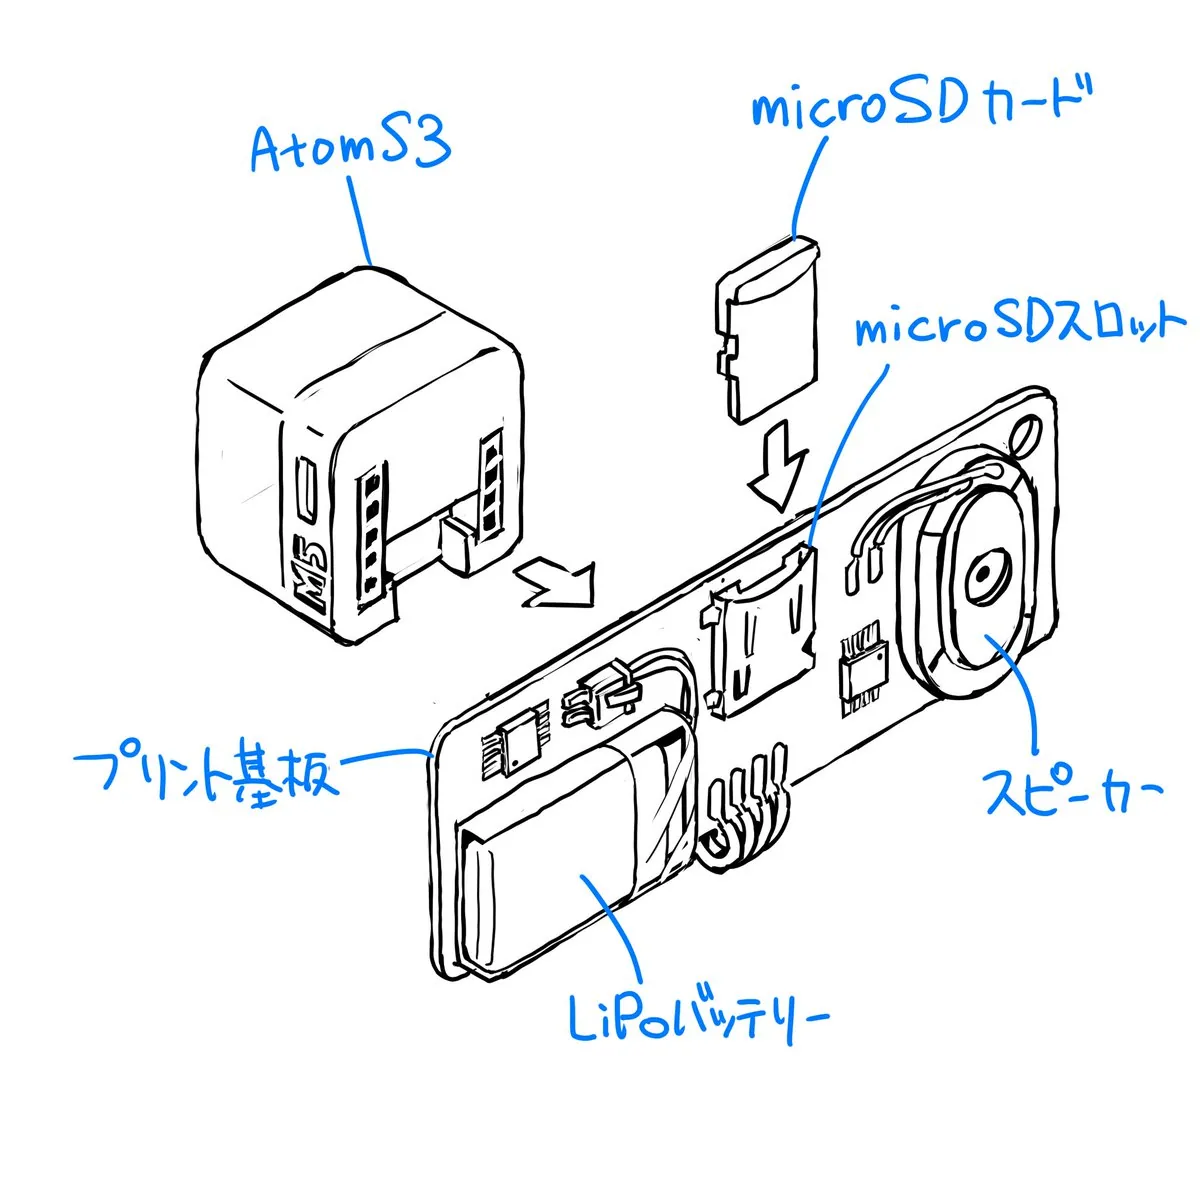
A two-part prompt sequence for Nano Banana Pro (using its 'Thinking Mode') to convert a rough sketch into precise, CAD-like line art. The first prompt instructs the model to finalize the rough sketch, referencing blue text annotations, removing ambiguity, and applying line weight variation. The second prompt is a follow-up instruction to apply the same style to subsequent rough sketches. - AIPinMaker
プロンプト
Create a creative image of Sketch To Cad Style Line Art Conversion Prompt. Style: photorealistic. Composition: balanced and well-framed. Lighting: natural with cinematic mood. Category: photography. Reference: sketch-to-cad-style-line-art-conversion-prompt-7000.
参照画像
このAI画像プロンプトテンプレートの使い方
 1
1プロンプトをコピー — テンプレートのプロンプトとネガティブプロンプトを取得。  2
2モデルを選ぶ — 最適な推奨AIモデルを選択。  3
3生成 — ワンクリックでスタジオを開いて作成。
関連テンプレート

Convert Graphic to Pencil Rough Design
Create a creative image of Convert Graphic To Pencil Rough Design. Style: photorealistic. Composition: balanced and well-framed. Lighting: natural with cinematic mood. Category: photography. Reference: convert-graphic-to-pencil-rough-design-2375.

Hiking Photo to Marker Sketch
Create a creative image of Hiking Photo To Marker Sketch. Style: photorealistic. Composition: balanced and well-framed. Lighting: natural with cinematic mood. Category: photography. Reference: hiking-photo-to-marker-sketch-17380.

Turn children’s drawings into comic-style characters
Create a anime image of Turn Childrens Drawings Into Comic Style Characters. Style: photorealistic. Composition: balanced and well-framed. Lighting: natural with cinematic mood. Category: anime. Reference: turn-childrens-drawings-into-comic-style-characters-347.

Image-to-Image Action Generation Template
Create a cinematic image of Image To Image Action Generation Template. Style: photorealistic. Composition: balanced and well-framed. Lighting: natural with cinematic mood. Category: cinematic-video. Reference: image-to-image-action-generation-template-9155.

Gestural Ink Fashion Illustration
ASPECT_RATIO: [3:4 (aspect ratio)] SOURCE_IMAGE: [uploaded photo (reference)] ACCENT_COLOR: [single vivid highlight color (accent color)] Use the uploaded photo as the base image and the only identity source. Keep the person exactly the same and clearly recognizable. Ignore the original framing and always recompose into a tight close-up or upper-body editorial crop, with the face dominating the frame. Transform the image into a gestural editorial ink fashion illustration. The style must be built from bold black brushwork, not delicate sketch lines. Use: very thick black brush strokes broad dry-brush sweeps large asymmetrical black ink masses long loose calligraphic lines broken contours scratchy secondary linework strong black-on-ivory contrast smooth monochrome skin The thick strokes must be clearly dominant. Do not render the portrait mainly with thin contour lines. Do not make it neat, polished, or softly illustrated. The image should feel painted with a loaded brush and finished with sharp expressive pen marks. Keep the portrait stylish and high-fashion. Use one hero accessory, preferably oversized translucent tinted sunglasses. The accent color [ACCENT_COLOR] must live mainly inside that accessory, especially in the lenses, as a bold luminous tint. Only tiny supporting traces of the same color may appear elsewhere.

Printable Paint by Numbers Generator
Create a professional high-resolution paint-by-numbers template from the provided image as a single PNG only. Use an A4 portrait ratio canvas (canvas size) at 300 DPI with a pure white background. The main artwork must be a clean black-and-white line drawing containing only black outlines, black numbers, and white unfilled paintable areas. Do not create a PDF, document, mockup, multi-page layout, or colored version. Do not use color, gray, shading, texture, gradients, transparency, or pre-filled areas in the main artwork. Analyze the original image and choose the number of colors adaptively based on image complexity, from 1 to a maximum of 14 colors (color count). If the image has only 1–2 important colors, use only 1–2 colors; for simple images use 3–6 colors; for medium complexity use 7–10 colors; for complex, photographic, or highly detailed images use 11–14 colors. Do not force unnecessary colors. Assign each selected color one unique number and merge similar shades unless separation is essential for recognition. Convert the image into simplified, fully closed, easy-to-paint regions while preserving the recognizable composition, main objects, characters, text, logos, foreground, background, and key details. Every paintable white region must contain the correct black number, centered clearly inside the matching area, readable, upright, and not touching outlines. Large black or dark areas from the original must remain white paintable regions with the correct number, not filled black. Only tiny permanent black line details, such as mouth lines, nostrils, pupils, eyelashes, seams, or small decorative strokes, may remain unnumbered. At the bottom of the same PNG, add a neat legend section with the heading “Instructions”, the sentence “Paint the areas with the matching colors.”, and a list of every used number with a small color swatch and the English color name. Color swatches may appear only in the legend. Ensure the numbering exactly matches the legend, every paintable area is numbered, all regions are closed, and the final result is clean, professional, print-ready, and recognizable as the original image.3b:T8a9,Create a p
他のプロンプトを探す
カテゴリ別にAI画像・動画プロンプトをもっと見る。